Using AstrBot with PayPerQ
Run your own AstrBot chatbot on pay-per-use PayPerQ models instead of a subscription: add PayPerQ as an OpenAI-compatible provider in the AstrBot WebUI and chat with it.
What is AstrBot?
AstrBot is an open-source agentic chatbot platform from the AstrBotDevs team. You run it yourself, manage it from a web dashboard (the WebUI), and connect it to the model providers and messaging platforms you choose.
AstrBot's docs say it supports the native API formats of OpenAI, Google GenAI and Anthropic, so it can use OpenAI-compatible providers. PayPerQ exposes an OpenAI-compatible API, so you add it as an "OpenAI Compatible" provider and pay per request. Official site: astrbot.app.
Step by Step Set Up
1. Prerequisites
- A PayPerQ account and API key. Open ppq.ai/api-docs to copy the key shown there.
- Linux, macOS, WSL or Windows (PowerShell 5.1 or 7+): the platforms AstrBot's install scripts list. The script installs
uv, AstrBot and Python 3.12 for you.
2. Install AstrBot
Run this command in a terminal:
bashcurl -fsSL https://docs.astrbot.app/install.sh | bash
The installer asks two questions:
- Select language. Shows
1. English,2. 简体中文,3. 日本語with[1]as the default. Press Enter.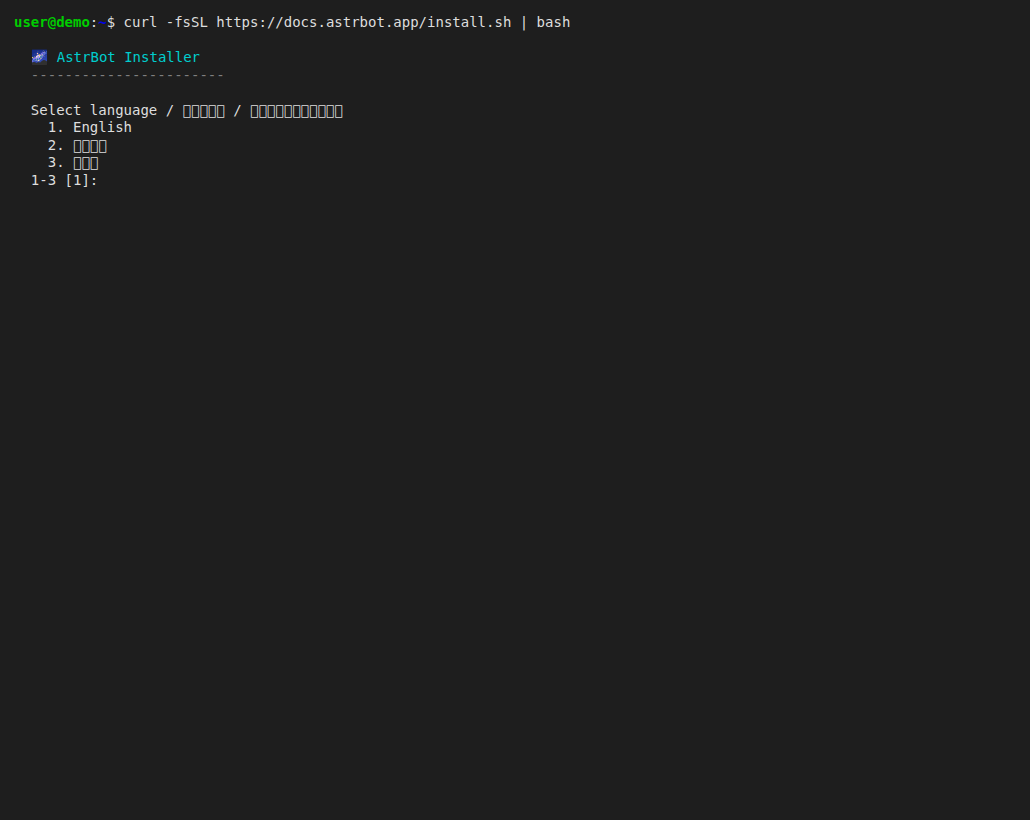
- Select a download source. Shows
1. Mainland China accelerated download mirrors,2. Official sources,3. Customwith[2]as the default. Press Enter.
It then downloads Python 3.12 and AstrBot and ends with [OK] AstrBot has been installed.
Windows: AstrBot's docs give a PowerShell installer instead: run
irm https://docs.astrbot.app/install.ps1 | iexin PowerShell 5.1 or PowerShell 7+.
3. Initialize AstrBot
Open a new terminal so the astrbot command is on your PATH.
Note: the installer's closing message tells you to reload your shell:
source ~/.bashrc(Bash),source ~/.zshrc(Zsh),source ~/.config/fish/config.fish(Fish) or. $PROFILE(PowerShell). Running the line for your shell works instead of opening a new terminal.
Run this command to create AstrBot's data folders:
bashastrbot init
It asks one question:
- Install AstrBot to this directory? Shows your current folder and
[Y/n]. Press Enter to accept.
It ends with Done! You can now run 'astrbot run' to start AstrBot.
4. Start AstrBot and log in
Run this command and leave the terminal open:
bashastrbot run
The log ends with a block like this: AstrBot v… WebUI is ready, Local: http://localhost:6185, Initial username: astrbot and a random Initial password.
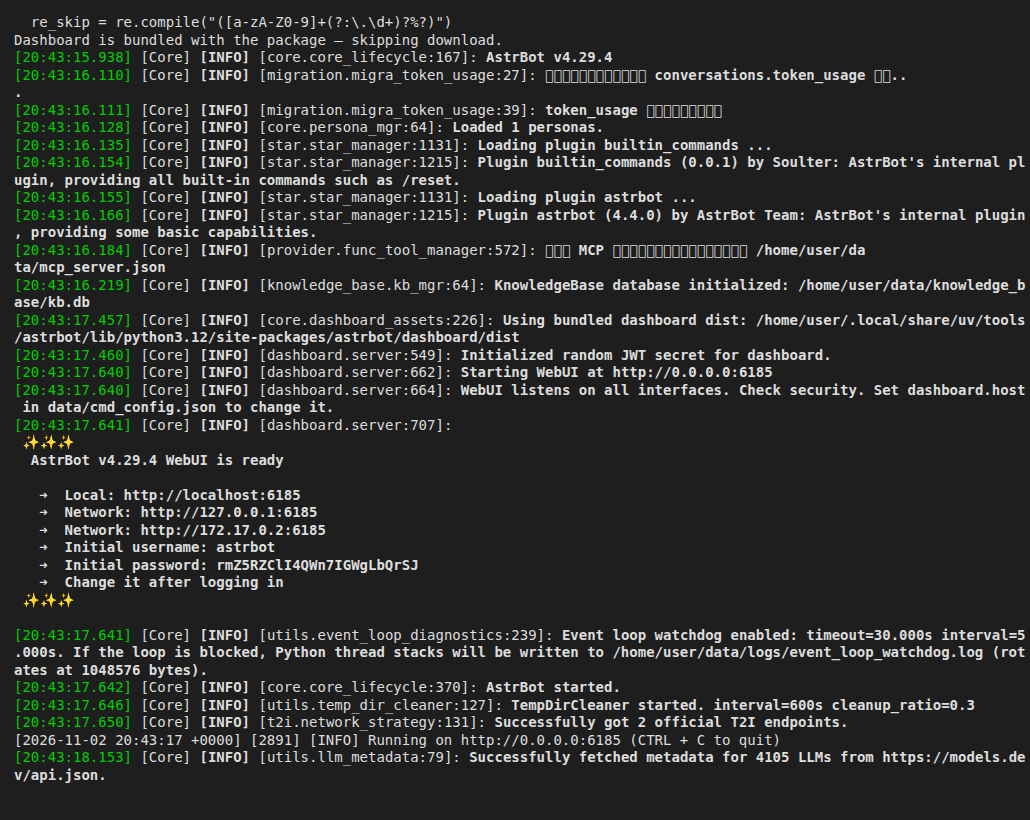
Open http://localhost:6185 in your browser, enter the initial username and password from the log, and log in.
Note: the WebUI follows the browser's language. The globe icon at the top of the login page opens a language list that includes English.
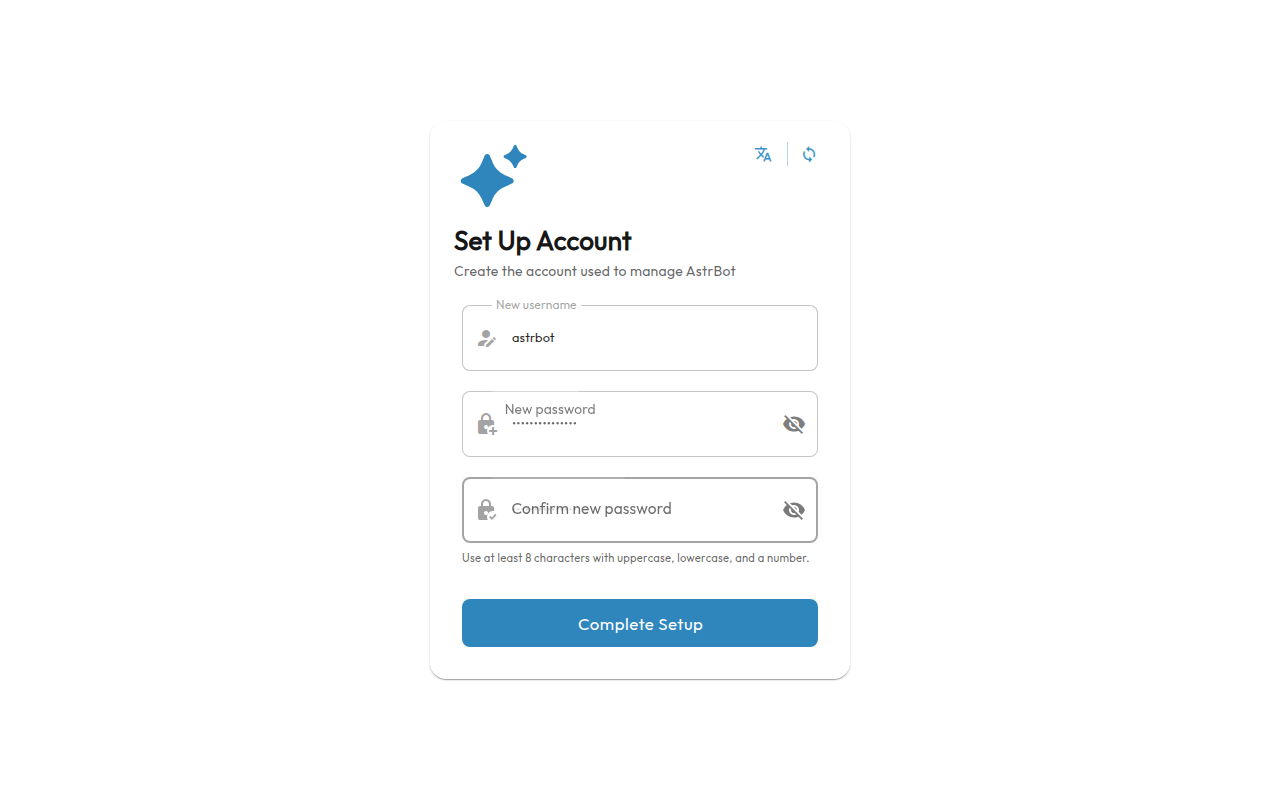
The first login opens a Set Up Account page:
- New username. Type the username you want to use from now on.
- New password and Confirm new password. Type the same password twice: at least 8 characters with an uppercase letter, a lowercase letter and a number.
- Click Complete Setup. The Welcome page opens.
5. Add PayPerQ as a provider
In the WebUI sidebar, click Providers, make sure the Chat Completion tab is selected, and click Add next to Provider Sources. In the New model provider list, choose OpenAI Compatible. A provider source opens; fill in these fields:
- ID:
payperq - API Key:
<your PayPerQ API key> - API Base URL:
https://api.ppq.ai/v1
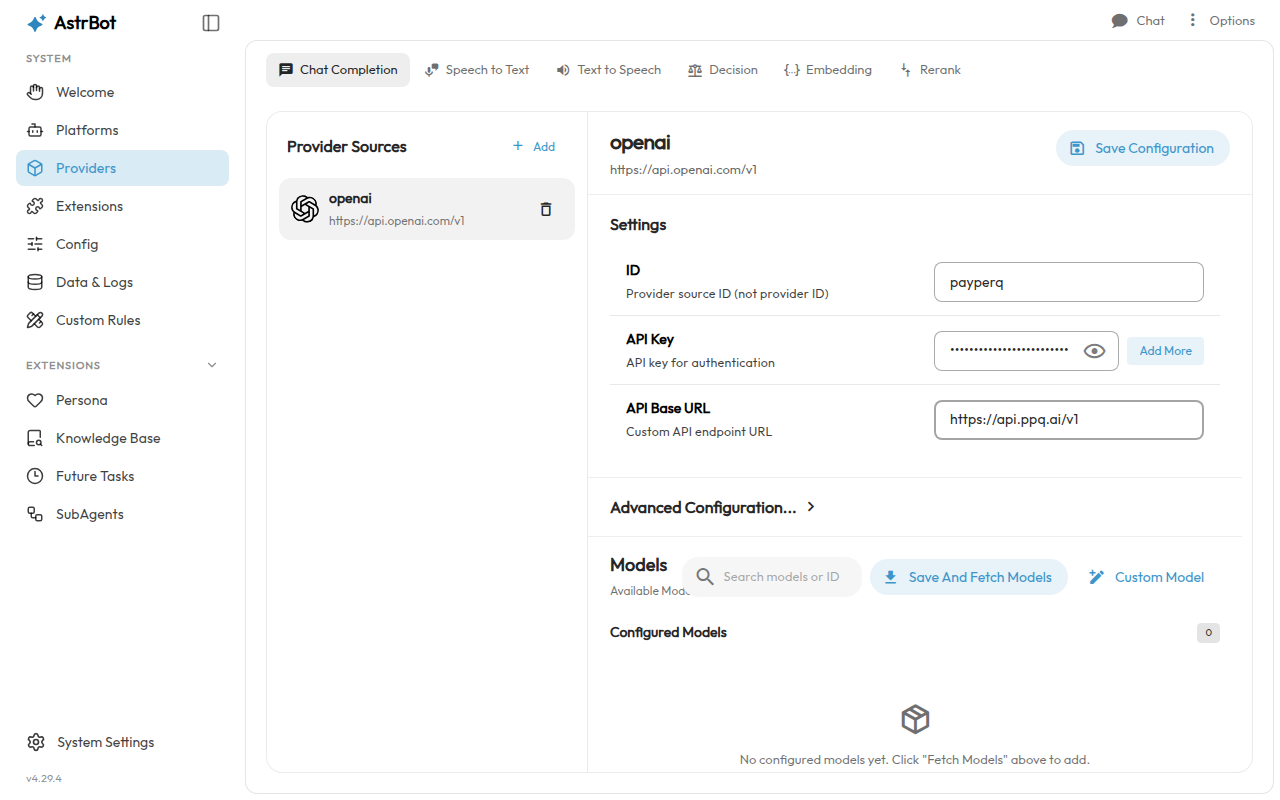
Note: AstrBot's docs say that for an OpenAI-compatible service the base URL should end in
/v1, and to add it if it is missing.
The provider source form is now filled in and ready for Save And Fetch Models in the next step. AstrBot stores the key in its own configuration, so you do not need to set an environment variable.
6. Pick a model
Click Save And Fetch Models. The Available Models count shows the models PayPerQ returned.
Type mistralai/mistral-nemo in Search models or ID, then click the + beside it in Available Models. An Add payperq/mistralai/mistral-nemo dialog opens with Enable switched on and Text and Tool use ticked. Click Save.
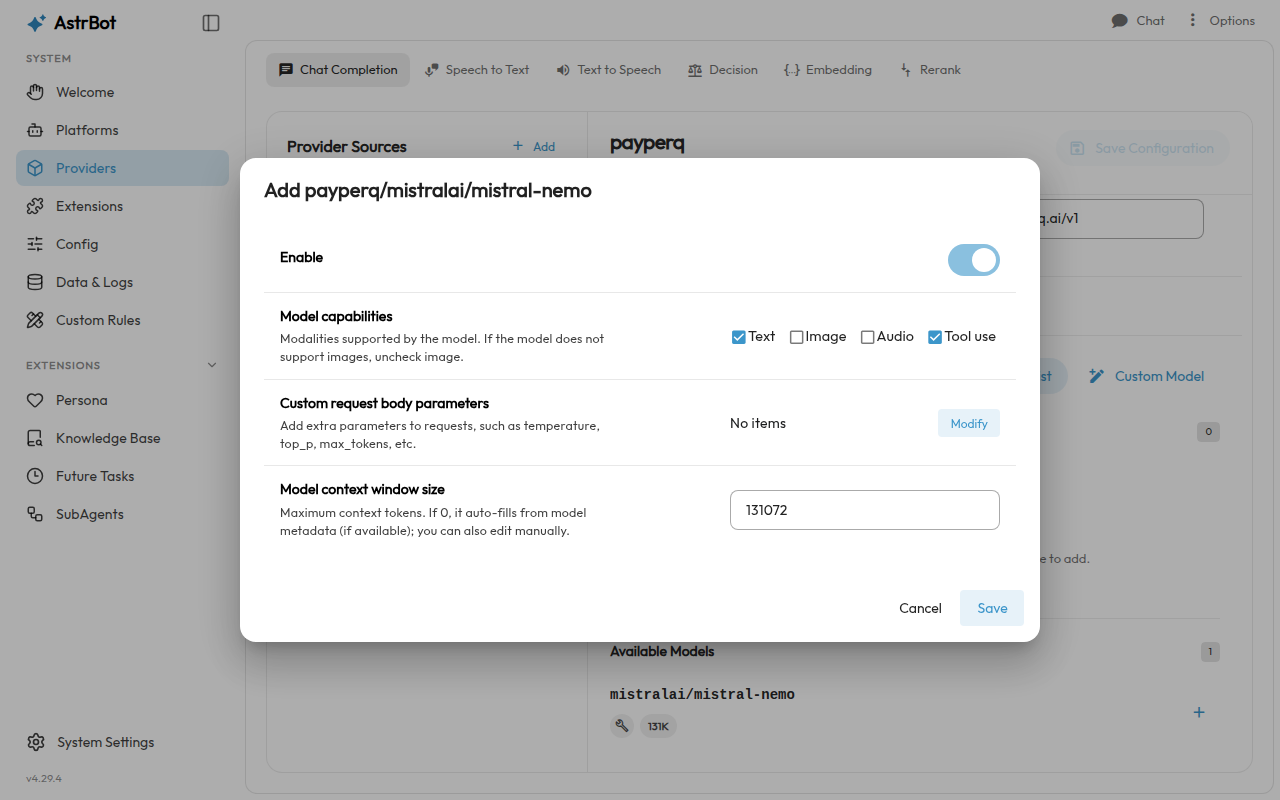
Note:
mistralai/mistral-nemois the example model for this guide. At the time of writing it costs $0.030595 per 1M input tokens and $0.03165 per 1M output tokens. See api.ppq.ai/v1/models for current prices and the full model list; any model ID from that list can be added the same way. The catalog lists plain IDs such asmistralai/mistral-nemo; AstrBot shows them aspayperq/mistralai/mistral-nemo, with your provider ID in front.
The model now appears under Configured Models as payperq/mistralai/mistral-nemo.
Next, tell AstrBot to use it for chat:
- In the sidebar, click Config and keep Default Configuration selected at the top.
- Under AI, on the Model tab, open the Chat Model dropdown (it shows Not selected) and choose
payperq/mistralai/mistral-nemo. - Click the round Save Configuration button at the bottom right of the page. A green confirmation appears.
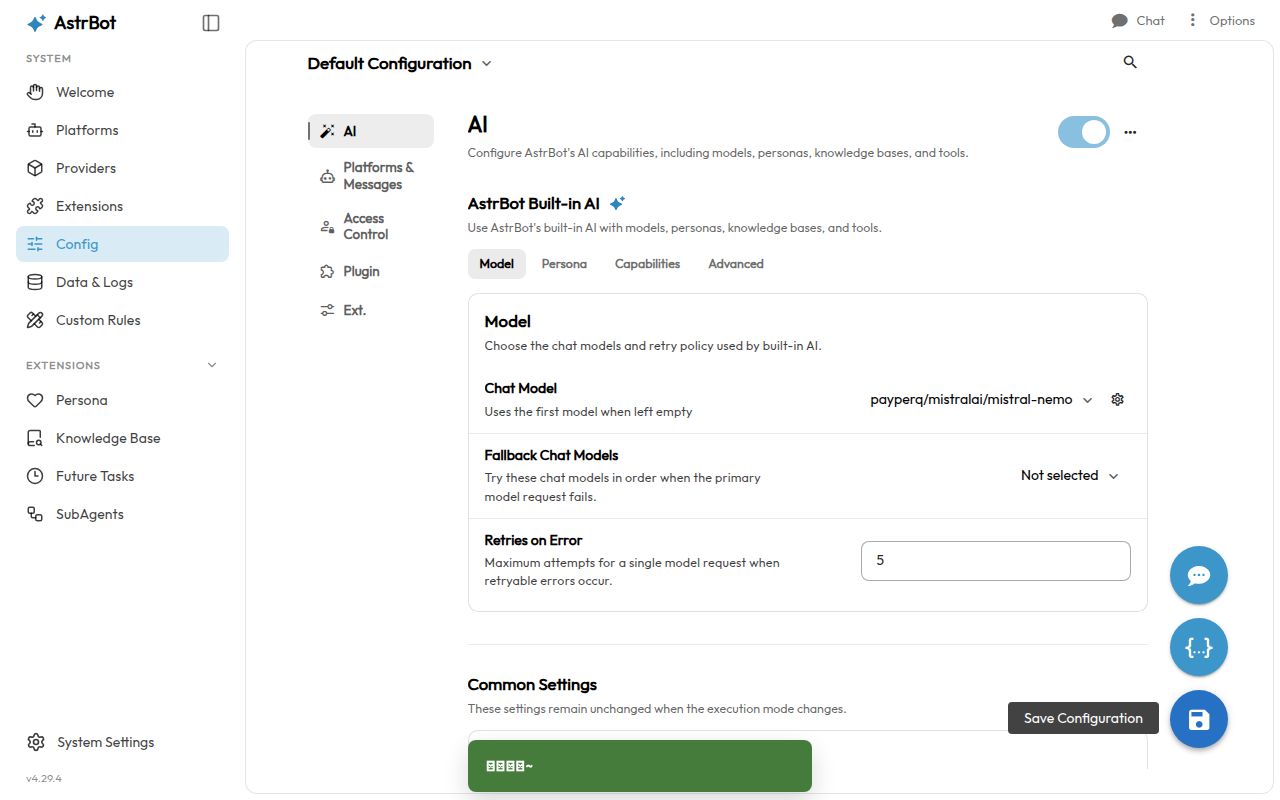
7. Check the provider and model
Go back to Providers, select the payperq source, and click the plug icon (Test model) beside payperq/mistralai/mistral-nemo under Configured Models.
A green message appears: Model payperq/mistralai/mistral-nemo test passed, latency … ms.
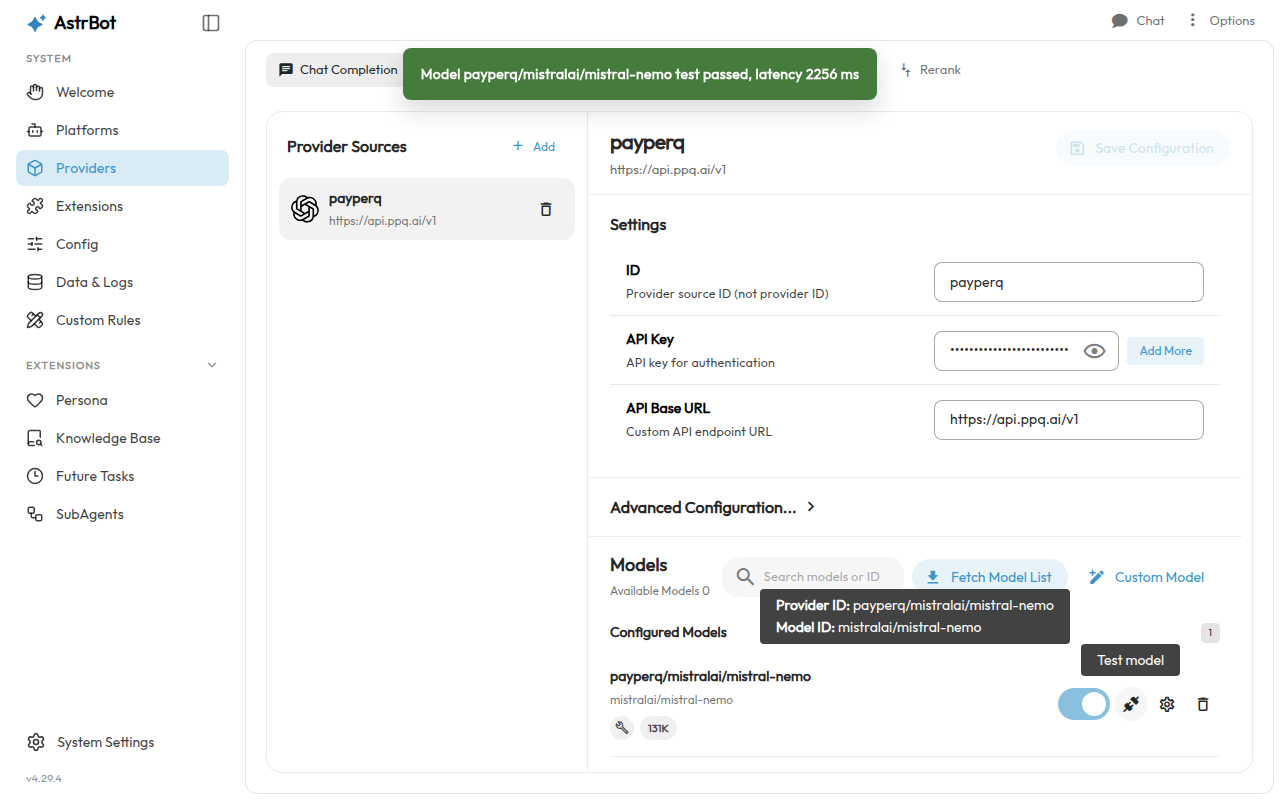
8. Send a test prompt
Click Chat at the top right of the WebUI to open ChatUI. Type this prompt in the Ask anything... box and press Enter:
textReply with the word OK
The model answers OK.
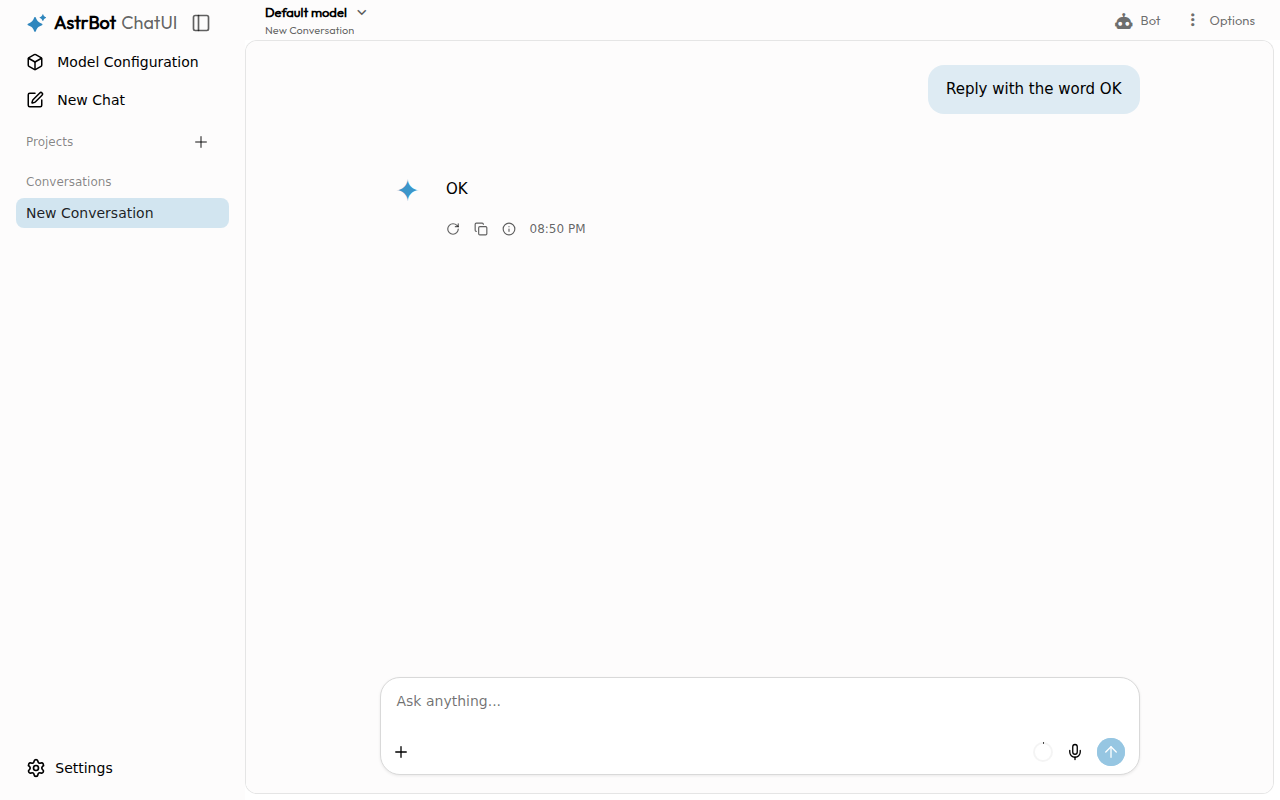
The setup is complete: AstrBot now answers through PayPerQ. Check what each request cost at ppq.ai/account-activity. To switch models, add another model from the PayPerQ list as in step 6 and select it as the Chat Model.
Troubleshooting
astrbot: command not found right after the installer finishes. What happened: the terminal you installed from does not have the folder that holds astrbot on its PATH, and source of your shell file did not change that. Likely cause: the shell profile was not updated by the installer. Fix: run ~/.local/bin/uv tool update-shell, then run source ~/.bashrc (or open a new terminal) and run astrbot init again.
Problems?
Please contact us through the customer communication chatbot in the bottom right of the PayPerQ site, in our Telegram channel or on Discord.
This guide is open source. If a step no longer works, open the guide on GitHub and use the pencil icon to propose a fix, or open an issue; changes go live after a PayPerQ maintainer reviews them.
What is PayPerQ?
PayPerQ is the private way to use AI. You get the big-name models from Anthropic, OpenAI, Google and xAI, the best open-source models, and TEE models that run inside a hardware enclave where not even the model's host can see your data. Chat, image, video and audio, all in one place, with no account and no subscription. You top up a balance with crypto or a card, from as little as 10 cents, and pay only for what you use. Most users spend about $4 a month, against $20+ for a single ChatGPT subscription.
Privacy is built in rather than bolted on. Every chat request is served inside a secure enclave that PayPerQ's servers, staff and logs cannot read into, so PayPerQ never sees your prompts or responses. Choose a TEE model and the model's host cannot read them either.
Why Use PayPerQ?
- Private by default - chats are served inside a secure enclave PayPerQ cannot read, and every chat model shows its privacy tier (Anon, ZDR or TEE)
- No account needed - no sign-up and no email; a credit id is all it takes
- Pay with crypto or card - Bitcoin, Lightning, Monero, stablecoins and more, or a credit card
- Hundreds of AI models from every major provider in one place
- Pay per use - no subscriptions; top up from 10 cents and pay only for what you use, about 1 cent per query on average
- Your history stays yours - conversations are stored on your device by default
Getting Started
- Visit ppq.ai
- Top up your balance with crypto or a card (as little as 10 cents)
- Pick a model, check its privacy tier, and start chatting
No account, no sign-up. Fund and go.